Steps to Write a Check Correctly: A Comprehensive Guide
Whether you're paying bills or making a purchase, knowing how to write a check correctly is an essential skill to have in today's digital age. Writing a check can seem like a relic of the past, but it's still a widely accepted and secure way to transfer money. In this article, we'll walk you through the steps to write a check correctly, covering everything from understanding the basics to avoiding common mistakes.Step 1: Date the Check
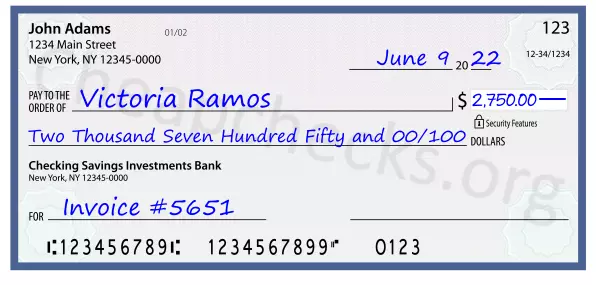
The first step to writing a check is to date it. Write the date in the top right-hand corner of the check, using the format "Month/Day/Year." Make sure to use the current date, as this is the date the check will be processed.
- Use the correct date format
- Make sure it's the current date
Next, write the name of the payee in the "Pay to the order of" line. This is the person or business you're paying, so make sure to get the spelling correct. You can also add a nickname or shortened version of the name if you want, but be careful not to confuse it with another check.
Such details provide a deeper understanding and appreciation for Steps To Write A Check Correctly.
- Write the name clearly and legibly
- Use the correct spelling and punctuation
- Consider using a nickname or shortened version if you want
Step 3: Write the Amount
Writing the amount is a crucial step in writing a check. You'll need to write the amount in both numbers and words. The numbers should be written on the dollar line, while the words should be written on the line above. Make sure to use correct grammar and spelling, and don't forget to put a decimal point between the dollars and cents.
- Write the amount clearly and accurately
- Use the correct format (e.g., "$100.00")
- Make sure the amount is in both numbers and words

Step 4: Add a Memo (Optional)
If you want to add a memo to your check, this is the step to do it. The memo is a brief description of what the check is for, and can be helpful for the recipient to understand the purpose of the payment.
- Keep the memo brief and concise
- Use simple language and avoid abbreviations
Step 5: Sign the Check
The final step is to sign the check. Sign your name in the space provided, making sure to use the same signature you use for all your checks. Don't forget to keep a copy of the check for your records.
- Sign your name clearly and legibly
- Use the same signature you use on other checks
Conclusion
Writing a check may seem like a simple task, but it's essential to get it right to avoid delays or bounced checks. By following these simple steps, you'll be able to write a check correctly and confidently send money to anyone you want. Remember to always double-check your work and keep a copy of the check for your records.
Additional Tips
- Use a pen to write the check (don't use a pencil)
- Keep a check ledger or register to track your checks
- Don't forget to sign the check
- Make a copy of the check for your records


:max_bytes(150000):strip_icc()/CheckToRegister-5a0c669a89eacc0037fb1ca3.png "GrammarCheck - Check your text online")


 - wikiHow")


![View of How to write a check in 6 easy steps [+ Visuals] | PayPal US](https://www.fidelity.com/bin-public/600_Fidelity_Com_English/images/learning-center/charts-and-graphics/Write%20the%20amount%20the%20check%20is%20for.jpg "How to write a check in 6 easy steps [+ Visuals] | PayPal US")


